Thursday, March 28, 2013

Madd Tutorial 44

Still on the fence about MSC's Emerald City grab bag?
Well don't be because it's pretty darn awesome, and won't be around forever! 
Also, the three greens in this grab bag are PERFECT for creating an Ombré (gradient) green look.
If that's not good enough then here is this look featuring ALL of the colors from the grab bag.

Now onto the tutorial!

After the normal eye prep you're going to grab Wishes & Wonders.
Wishes & Wonders in going to go on the inner lid, blended out into the crease.

Next you're going to use Emerald City.
Apply Emerald City to the middle lid, and slightly in the crease. Blend Wishes & Wonders over Emerald City, adding more Wishes & Wonders as you blend.

Then comes Great & Powerful.
Great & Powerful is going to go on the outer lid, and slightly above the crease just like the others. Blend Great & Powerful over Emerald City.

Last color used is going to be Winkie.
Apply Winkie to the entire bottom lash line.

For an added pop (which totally isn't picked up on my camera) I added the Bad Witch glitter over top Great & Powerful. 

 Then applied my normal liner and mascara.

Thursday, March 21, 2013

Madd Tutorial 43

What better way to welcome Spring than with bright, and fun colors?!
To kick off the second day of spring I bring to you this beautiful,fun, and bright look.

First I gathered the items I was going to need.
NYX eyeshadow base in white, MSC Awesome Sauce, UD 24/7 liner in Perversion, ELF liquid eyeliner in black, NYX JEP in Black Bean, and Benefit's They're Real mascara.
Then for some eye prep with NYX eyeshadow base & MSC Awesome Sauce

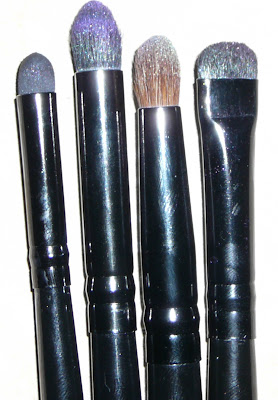
While this is "drying" I grab my brushes, and any other tool I may need.
Smudge sponge, Pointed blender, Dome blender, and Brow brush.

On to the colors!

Color 1.
Snotface
Using the pointed blender, apply Snotface to the inner lid. Take the dome blender, and blend the outer part of the inner lid to make it appear soft.
 Color 2.
Tron
Now wipe of the same brush and then dip it into Tron. Apply to the middle lid. Then using the dome blender blend Tron over Snotface.
Color 3.
Mondo
Again, using the cleaned off pointed blender apply Mondo to the outer lid, and take it into the crease, With the dome blender blend the crease, and then blend Mondo into Tron.

Color 4.
Outlaw Star

Using the brow brush I applied Outlaw Star to the entire lower lash line. Then take some Mondo and apply it over the outer portion of the lower lash line.

Add your favorite liner and mascara to finish this look off.
I decided to smoke out the outer portion of the water line, but it's not necessary if you don't want it that way.


Lips are OCC lip tar in Anime

Thursday, March 14, 2013

Madd Tutorial 42

Decided to play with the newest piggies in my collection.
I'm pretty sure I've done a combo similar to this one, but I really love the way these colors go together, especially in different shades of the colors.

After you prep your lids the first color you're going to apply is Little Drop of Poison.
(I'm sorry this is SO darn blurry! I took 5 different pictures, and they all came out like this or worse.)

Take Little Drop of Poison, and apply it to the inner lid and inner lash line. 
I found this color went on a little sheer for me so you may have to pack it on a little more to get the correct color payoff.

Next up is Box of Rain
Box of Rain is going on the middle of the lid. Blend Box of Rain over Little Drop of Poison, adding more LDoP as you blend.

Last color in the mix is Charming
Add Charming to the outer lid,crease and outer lower lash line. Blend Charming into Box of Rain. Also, blend Charming in the crease.
I added some more Box of Rain in the middle to make it stand out a bit more.
Take a blending brush to blend out the edges of Charming so that there isn't a harsh line. You want it to end up looking "faded."

Finished look


Friday, March 8, 2013

Madd Tutorial 41

In honor of  Comet PAN-STARRS  coming into view for the Northern hemisphere this evening, I decided to do a "celestial" EotD! 


Start of by prepping the eye lid, as usual.

I used my handy dandy brushes that I always use

The First color I'm going to use I Starry Night.
Grab up a generous amount of Starry Night in your brush. Apply it to the inner lid, and inner lower lash line.

Next get ready to jump in the TARDIS!
TARDIS is going to go on the middle lid. Blend Starry Night over TARDIS.

Now let's go on a Space Oddity.
Apply a good layer of Space Oddity to the outer lid, and lower outer lash line. Blend Space Oddity over TARDIS, adding a little more of each as you blend for a smooth look. Also, blend the bottom as line.
You can use a black base for the outer portion of the lid for a darker look if you would like.

Last color! Add some Stargazer under the brow for a brow highlight.
Finish up the out of this world look with your favorite liner and mascara.